Combination Knitting
patterns | blog | classes | portfolio | bio | appearances | books
« Casting
On
« Making
A Knit Stitch
« Making
A Purl Stitch
« Increasing
a Stitch
« Decreasing
a Stitch
« Binding
Off
« Picking
Up Stitches
« Horizontal
Stripes
« Weaving
Ends
« Invisible
Seams 1 - Stitch to Stitch
« Invisible
Seams 2 - Row to Row
« Invisible
Seams 3 - Stitch to
Row
« Size
/
Fit Chart for Women
« Confessions of a Knitting Heretic
« Invisible
Seams 1 - Stitch to Stitch
Step
2:
It is a shame to spend weeks working on a
sweater only to have look of the garment
diminished by shoddy finishing. Making
beautiful seams is really quite
easy
Step
1:
Lay the two pieces to be joined (piece A
& piece B) edge to edge and line up
the stitches so that each stitch on piece
A corresponds to a stitch on piece B.
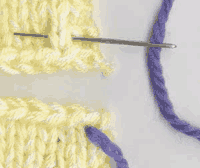
Using a darning needle pull the yarn from
the back of piece A through the center of
the first stitch in the row at the edge of
the piece. On piece B, work behind the
first stitch in the first row by inserting
the needle into the space between the
right side of the first stitch and pull
the needle out from the left side of the
stitch (figure 1). Return the needle to
piece A and reinsert into the center of
the stitch, going from from to back. Pull
the stitch taught, creating a new stitch
bridging piece A & piece B.

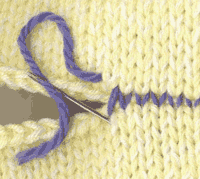
Repeat step 1 until the two pieces are
joined (figure 2). We've used a
contrasting color to demonstrate this
technique, but when using the same color
yarn as the pieces the seam will be
virtually invisible.
